Thursday, December 4, 2008

MEDIbuntu - Movies & Mp3 Playback

Okay, fresh off the first install..now what? Missing some of your favorite old Windows or OSX functionality and programs after experimenting with the pre-installed software? No worries, I'll offer some suggestions on free, alternative software and tell ya just how to get it. And now its time for the infamous question first asked by *nix n00bs galore...

"Soo.. how can I play all my p0r-I mean mp3s, movie 'backups' and Sopranos DVDs?"

No worries. The Ubuntu communitiy has made this easy with MEDIbuntu - Multimedia, Entertainment, and Distractions in Ubuntu. (Please note, some of these links are specific for i386 computers, if you have and amd64 or powerpc please check carefully and adjust accordingly.)

You can install the appropriate packages through the terminal or synaptic package manager.

ADDING THE MEDIBUNTU REPOSITORY

Now, to do this in the package manager, go to System > Administration > Synaptic Package Manager (or, press Alt+F2 simultaneously then type 'gksudo synaptic.')
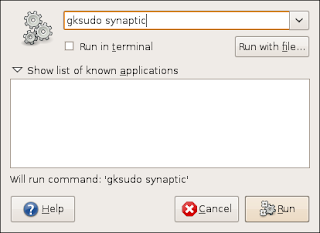
Enter your admin password, and select Settings > Repositories.


Go to the Third-Party Software tab, and add http://packages.medibuntu.org as the link, add you distro in lowercase letters (ie. gutsy, intrepid or jaunty) and for Components, enter 'free non-free' without the quotes.
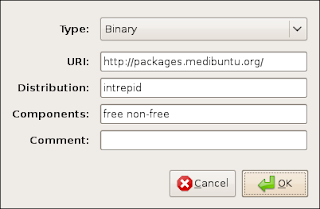

You'll also need to add the GPG security key (a harmless verification key for some 3rd party sources) in order to appreciate everything the MEDIbuntu repository has to offer. It is in the package manager under 'medibuntu-keyring.'


SAME THING...BUT WITH THE TERMINAL

To save time, you could open a terminal and copy and paste the following commands. The first one is to add the Medibuntu Repository source to your list of trusted sources so that you are able to receive future updates

sudo wget http://www.medibuntu.org/sources.list.d/intrepid.list --output-document=/etc/apt/sources.list.d/medibuntu.list
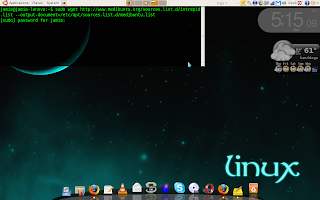
*Be sure to replace intrepid with your Ubuntu release name, for example 'jaunty,' 'intrepid' or 'hardy.' And to add the GPG key type:

sudo apt-get update && sudo apt-get install medibuntu-keyring && sudo apt-get update.


VIDEO & DVD CODECS


To install the codecs for Windows Media, Real, Apple, Divx, and other files which are not native to Linux, you can use the synaptic manager and search for 'w32codecs.' For the CLI, enter:

sudo apt-get install w32codecs


To enable DVD playback, the decoding library files are needed and you can again install through the package manager by searching 'libdvdcss2' or using APT:

sudo apt-get install libdvdcss2

MP3 and Video Players


If you are coming from Windows or Mac, you're probably looking for something decent as the default video player. The MEDIbuntu player is found in the repositories as 'mplayer.' Or using the terminal,

sudo apt-get install mplayer

I also highly recommend VLC Media player, plus a few plugins (such as mozilla for firefox), which can all be found by searching 'vlc' in the software manager. In the terminal, key the following:

sudo apt-get install vlc vlc-plugin-esd mozilla-plugin-vlc

VLC in action:
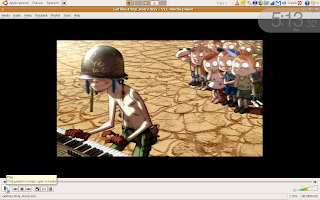

As far as MP3 playback in Linux is concerned, the aforementioned media players will playback almost any media format available. If you are looking for a program to organize your media collection and interface with your iPod (so, basically some kinda iTunes clone) there are about three or four programs worth taking a look at: AmaroK, Banshee, Rhythmbox and, newly released version 1.0 from Mozilla, Songbird. [Of course you could try installing iTunes with WINE, but I've never been able to get it to recognize my iPod] All of these are available in the repositories and maybe someday I'll do a comparison post. For now, enjoy your media collection and feel free to email me or comment for any questions on playback or any programs/entries in this posting!

Tuesday, December 2, 2008

Tilda - Creating a Drop-Down / Quake (or other FPS) Style Terminal window


This guide will walk you through the installation of a Quake/Half-life style drop-down terminal window, such as the one pictured above.

While I mostly get around in Ubuntu with the GUI, I do try and experience using the Terminal window as much as I can, and having one easily avialable via a hot-key (a single key 'shortcut') can be very convenient. The main reason I have decided to start off with this post, is that I find having the terminal window readily available so that when you are copying and pasting commands from the web, you can have the drop-down terminal window be transparant and 'above' the other windows making it easy to still read whats online while monitoring the installation.

First off, the following installation instructions are for the Gnome Desktop Environment, if you are running KDE, I recommend checking out Yakuake. There are a couple different Quake-style console apps for Gnome, but I prefer to use Tilda, and I will briefly discuss the others at the end.

INSTALLATION

Tilda can be found in the Synaptic Package Manager (Alt+F2 and enter 'synaptic'). Just type 'tilda,' mark it for installation, and apply. To download the program through the terminal, open a window and type:

sudo apt-get install tilda

After the installation has completed, it can be accessed under Applications > Accessories > Tilda

By default, the hot-key is (duh) the Tilda button. "The what!?" The tilda. That wavy line that you've never known actually had a name, on the same button the crazy-lookin apostraphe, below the Esc key. To change this (I like to use the tilda button to switch application windows - look for an upcoming how-to post on that!) simply right-click anywhere on the Tilda terminal window and select preferences. A menu will pop up with several tabs.

The 'Keybinding' tab, is where you will change what button to press in order to hide/view the window. You can also adjust other options such as the size of the window, add borders, add background image, change colors, etc.

INITIATE TILDA ON START-UP

You may be wondering at this point just how annoying its gonna be to have to wait for your machine to start-up, then select Tilda from the application menu everytime, or if theres a way for it to initiate on startup. Well, there is. And its easy.

Just go to System > Preferences > Sessions and enter the information as seen below. The command is simply 'tilda' (without quotes), the title is Tilda, and you can put whatever comment you damn well please.


And there you have it, folks. Feel free to mess around with some of the settings, as you can see from the screenshots, I prefer a classic matrix-esque color scheme and to have the terminal window only take up a portion of my screen.

Also, if Tilda isn't quite what you are looking for, or doesn't agree with your system for whatever reason, don't fret, you can also look into YeahConsole (the simplest drop-down console) or Guake. Both can be found in the repositories.

Sunday, November 30, 2008

First things first...

OS Installation and some initial key words...

So you've finally given in to that pesky nerdster inside of you (or the weird kid next door always telling you to give it a shot) and decided to try out the latest Ubuntu distro (short for distribution, i.e. - the current release). Congrats, and welcome to a whole new world of software freedom!!

If you haven't already installed it, its fairly simple to do so. You can insert the disc while still in your old OS and try it live, or reboot your computer with the disc in the drive and give it a shot that way as well. Once satisfied, go ahead and setup the appropriate partitioning and follow the on-screen instructions for installation.

For some nifty guides on installing Linux while keeping Vista or XP on your machine, check out these how-tos from APCmag. Also, I highly reccomend their suggestion of installing Linux AFTER Windows, otherwise things do tend to get a little tricky.

Okay, assuming thats all taken care of, now what? Well, you're at least able to browse the web with pre-installed Firefox 3.0 (as of release 8.10 codename: Intrepid Ibex, the network manager should be extremely easy and straightforward to configure) . Before we get too deep in setting up your new OS, let's start off by explaining a few basic elements which will be referred to quite frequently from here on out.


Terminal: Ahh, the terminal. The command line interface. Gracing computers and intimidating users since the hayday of MS-DOS. THIS, ladies and gentlemen, is where it all goes down. The command line interface, or CLI, is exactly what it says. You type commands, line by line, to interface with your machine and can do everything from download software packages, move and delete files, and burn/copy a plethora of video formats. Throughout this guide, I will provide tips on avoiding this scaaary interface for the n00bs, but also provide tips on how it is used. An excellent guide for getting your feet wet in the Terminal, can be found HERE.

Root: The term 'root' in '*nixland' is most often used to define Administrator privelage. Note that within your filesystem there is a folder called 'root' with which you need admin privelages to access. Additionally, when you open the package manager GUI you are asked to input your root/admin password. However, if you attempt to download packages through the CLI, you must first let the computer know you wish to do something as root by typing 'sudo' (super-user do) and then the command, then it will prompt for the password.

Synaptic Package Manager: This program, found under System -> Administration, is equivelant to the Add/Remove program in Windows.

This is where a variety of free, open source software (FOSS) can easily be found and located. Alternatively, if you already know the specific package for which you are looking, you can simply type the appropriate command into the Terminal. The package manager accesses the archives of software which are held in Repositories. In order to get the most from your Ubuntu distribution, I suggest enabling all repositories, instructions are provided below.

ENABLING EXTRA REPOSITORIES (The First Real Lesson)

You can either open the Synaptic Package Manager and select Settings > Repositories, OR go to System > Administration > Software Sources and enter the admin password. I recommend ensuring that all boxes under the Ubuntu Software tab are checked off (multiverse, etc.).


You can also localize the Ubuntu server from which the software is downloaded. When you attempt to close the window, you will be prompted to reload your sources and some updates may already be available. Also, keep in mind that some software requires you to return to the Software Sources manager and add in their specific repository, but we'll get to that when the time comes.


These are just some of the many key words and programs to which I will be referring, and as new ones appear so shall their explanations. But, as always with any computer program, I highly recommend reading as much of the provided documentation as you can stomach, or sifting through the Ubuntu community forums.

Check back soon for the next few updates: How-to's on installing all the necessary files and programs to play your complete video/mp3 collection, desktop customization, suggested 'substitute' application reviews, and more!

Welcome

Welcome to gn00buntu! These are the helpings of an ex-Windows addict since 3.1 up through XP with limited programming knowledge, who has been working with Ubuntu Linux for almost 2 years. So this will be hopefully be geared towards new converts, or users who've just found a trick or two they havent seen before without having to sift through 100's of results on ubuntu forum and google searches. When users make that first switch from Windows or Mac to *nix, it can be a bit overwhelming perusing the forums for just the right answer. My goal here is to provide an easy to read, K.I.S.S. style guide for those just getting their feet wet, or too timid to key everything into the terminal. Again, welcome to my site, I hope you enjoy it, and I look forward to any and all criticisms and feedback! Let's get started!